This cookies were super delicious!!!
They're melt in the mouth cookies with a nice maple syrup flavour that makes them way better than the old vanilla ones. And the recipe is super simple, as they are your typical butter cookies.
I found these little treasures in dailydelicious while browsing through the blog after quite a long time without having a look at anything food-related in Internet.
I don't know why, but I've been feeling lazy since last spring. Fortunately this lazyness seems to be over and my baking lust has returned although I don't know when I'm going to recover my blogging lust -_-U, so this time I'll just post the pictures and the link to the recipe. I followed it step-by-step so there's nothing new I should be telling about it.
A friend of mine passed me the link of this wonderful bread, from the Pioneer Woman.
My bread was a bit too dry because I got impatient while kneading the dough and thus I added more flour than the necessary, but it tasted great anyways. Toasted or not it's a yummy breakfast and it looks soooo good... ^^
Ingredients:
75g white sugar 85g butter 245ml whole milk 415g all-purpose flour 2 eggs at room temperature 1 teaspoon salt 2 1/2 teaspoons active dry yeast 75g white sugar + 2 tablespoons cinnamon + 2 tablespoons melted butter Method:
Melt butter with milk. Heat until very warm, but don’t boil. Allow to cool until still warm to the touch, but not hot.
Sprinkle yeast over the top and stir gently. Allow to sit for 10 minutes.
In another bowl, mix sugar and eggs until combined.
Pour in milk/butter/yeast mixture and stir to combine.
Combine the flour and the salt and add half of it to the liquid mixture. When combined, add the other half and mix well.
Knead the dough for at least 10 minutes. If it's too sticky add 30g flour and knead for another 5 minutes (the dough ought to be a little sticky after the kneading).
Heat a metal or glass mixing bowl so it’s warm. Drizzle in a little olive oil, then toss the dough in the oil to coat. Cover bowl in plastic wrap and set it in a warm place for at least 2 hours.
Turn dough out onto the work surface. Roll into a neat rectangle no wider than the loaf pan you're going to use.
Brush the dough with 2 tablespoons of melted butter. Mix sugar and cinnamon together, then sprinkle evenly over the buttered dough.
Starting at the far end, roll dough towards you, keeping it tight and contained. Pinch the seam to seal.
Smear a loaf pan with softened butter. Place the dough, seam down, in the pan. Cover with plastic wrap and allow to rise for 2 hours.
Preheat the oven to 180ºC.
Bake in the preheated oven for 40 minutes on a middle/lower rack.
These cookies were originally a variation of someones I made some time ago (the chocolate and walnut cookies). The recipe is also for chocolate and walnut cookies, only that it comes from a different cookbook. This recipe is from Chocolate Basics: 80 Recipes Step-by-step (in spanish Recetas básicas de chocolate). I simply LOVE this book! It's got step by step photographs and explanations, which makes the recipes look less scary :-) Indeed, I find myself willing to attemp some layered cakes, which is something I usually don't dare to even give a second glare.
I made these cookies for my boyfriend's birthday, as one of his presents, because he loves the cookies this way, chewy rather than crunchy (I prefer them the other way ^^U). These cookies taste really good and are super easy to make, just as they seem in my book!
Ingredients:
200g white sugar 100g butter 150g chocolate with almonds 220g all-purpose flour 1 egg 1 teaspoon vanilla extract 1/2 teaspoon baking powder 1/2 salt Method:
Preheat oven to 170ºC.
In a saucepan, melt butter and let it warm.
Add the sugar and the salt to the butter mix until well combined.
Mix in the egg and then the vanilla extract until well combined.
In a bowl, mix the flour and the baking powder and the add the flour to the butter.
Chop the chocolate and add it to the dough.
Let the dough rest in the fridge for 15 minutes.
Take a small amount of cookie dough onto your palm and roll into a ball.
Put the balls onto a baking tray and press them slightly.
Bake in the preheated oven for 10-15 minutes until the borders brown.
Take the cookies out from the oven and let them cool completely in the tray before transfering them to a wire rack.
"Arroz con leche" means literally "rice with milk" and is typical from the spanish cuisine. I've done this dessert many times, but yesterday was the first time that I made it with freshly milked milk. My boyfriend's mother got me some from a neighbourg of hers who has a cowfarm :-) There's no comparison to the making it with the brand one that you buy in supermarkets. The result has a way richer flavour and is cooked faster than with the watered product that is sold in the stores.
You need patience to make the arroz con leche because it's a slow proccess. I usually need around 45 minutes to get the desired texture of it, but if you like it more liquid it'll take less, of course. Anyway, the result it's well worth of your time ^^
This recipe has the proportions I prefer of milk, rice and sugar, but some people may prefer it denser or sweeter or the contrary. I got these proportions after trying many times, so finding the ones that fits your taste better its just a matter of trial and error. With this recipe you get 3 servings (I allways make it for my parent and I ^^U).
The April 2011 Daring Bakers’ challenge was hosted by Evelyne of the blog Cheap Ethnic Eatz. Evelyne chose to challenge everyone to make a maple mousse in an edible container. Prizes are being awarded to the most creative edible container and filling, so vote on your favorite from April 27th to May 27th at http://thedaringkitchen.com!
First of all, things keep going as I mentioned last February, wich means that my job is still like hell T_T At least it looks like this situation is coming to an end (because so does the project). Thus I'm leaving the chatting till then and I'm making this post in a hurry -_-U
I admit that I didn't embrace this challege as much as I should, partly because the maple syrup is very expensive in here and partly because I'm quite tired when I get home to be in the mood for making mousse.
I made the edible containers with chocolate, following the instructions of this web. They were kind of a mess because some of the balloons were so glued to the chocolate that I almost broke the vessels.
Here come the recipe of the Maple Mousse:
Ingredients:
240ml pure maple syrup 4 large egg yolks 1 tablespoon unflavoured gelatine 360ml whipping cream Method:
Bring maple syrup to a boil and then remove from heat.
In a large bowl, whisk egg yolks and pour a little bit of the maple syrup in while whisking (this is to temper your egg yolks so they don’t curdle).
Add warmed egg yolks to hot maple syrup until well mixed.
Measure 1/4 cup of whipping cream in a bowl and sprinkle it with the gelatine. Let it rest for 5 minutes. Place the bowl in a pan of barely simmering water, and stir to ensure the gelatine has completely dissolved.
Whisk the gelatine/whipping cream mixture into the maple syrup mixture and set aside.
Whisk occasionally for approximately an hour or until the mixture has the consistency of an unbeaten raw egg white.
Whip the remaining cream. Stir 1/4 of the whipped cream into the maple syrup mixture. Fold in the remaining cream and refrigerate for at least an hour.
Remove from the fridge and divide equally among your edible containers.
The February 2011 Daring Bakers’ challenge was hosted by Mallory from A Sofa in the Kitchen. She chose to challenge everyone to make Panna Cotta from a Giada De Laurentiis recipe and Nestle Florentine Cookies.
Well, this month I managed somehow to complete the challenge just in time. It's not like I'm gonna start complaining about my job now (yes, it is XD), but these past weeks have been hell for me and the pleople I'm working with in my current project. There are just too many last-minute-super-urgent-changes to be able to cope with and finish in time.
While preparing for this month's challenge I had to face some problems regarding the ingredients needed for the florentine's cookies: as far as I'm aware you can't find in any regular (spanish) supermarket neither dark (or light) corn syrup or quick oats. And I didn't had time to go browsing specialized stores in search for some ingredients that I'm not likely to use again in a loooong time. So I substituted the dark corn syrup with honey and the quick oats with all-bran cereals :-)
As for the fruit gelée, I chosed an orange gelée because I had some at home and I think that the orange flavour is a great counterpart to the honey-ish flavour of the panna cotta.
Here come the recipes I used:
Ingredients for the Orange Gelée:
1 big orange 60g granulated sugar 45ml water 1 and 1/2 teaspoons unflavored powdered gelatin Method for the Orange Gelée:
Sprinkle gelatin over water.
Peel the orange and cut it in small pieces. Place the orange and sugar in a small saucepan and simmer until sugar has dissolved.
Now mix the gelatin into the orange mixture and stir until gelatin has dissolved.
Remove from heat and allow to cool (close to room temp). Put it in the bottom of a glass (or reserve for layering it into or above the Panna Cotta).
Ingredients for the Panna Cotta (I made half of the recipe):
120ml whole milk 1/2 tablespoon unflavored powdered gelatin A pinch of salt 360ml whipping cream 40ml honey 1/2 tablespoon granulated sugar Method for the Panna Cotta:
Pour the milk into a pot and sprinkle gelatin evenly and thinly over the milk (make sure the pot is cold by placing it in the refrigerator for a few minutes before you start making the Panna Cotta). Let stand for 5 minutes to soften the gelatin.
Place the pot over medium heat on the stove. Heat this mixture until it is hot, but not boiling, about five minutes (I whisk it a few times at this stage).
Next, add the cream, honey, sugar, and pinch of salt. Making sure the mixture doesn't boil, continue to heat and stir occasionally until the sugar and honey have dissolved 5-7 minutes.
Remove from heat, allow it to sit for a few minutes to cool slightly. Then pour into a glass.
Refrigerate for at least 6 hours or overnight.
Ingredients for the Florentine Cookies (this is my adaptation):
100g unsalted butter 160g all-bran cereals 150g granulated sugar 95g all purpose flour 60ml honey 60ml whole milk 1 teaspoon vanilla extract A pinch of salt Method for the Florentine Cookies:
Preheat oven to 190°C. Prepare the baking sheet with silpat or parchment paper.
Melt butter in a medium saucepan, then remove from the heat..
To the melted butter add the all-bran, sugar, flour, honey, milk, vanilla, and salt. Mix well.
Drop a tablespoon full, 75mm apart, onto your prepared baking sheet. Flatten slightly with the back of your tablespoon, or use a spatula.
Bake in preheated oven for 6-8 minutes, until cookies are set. Cool completely on the baking sheets.
I'm happy with the Panna Cotta even though it didn't set completely, but still it had some consistency, which is not that bad taking into account that this was my first attempt! ^^
The florentine cookies were a nice surprise despite all the things that could have go wrong! Looks like my substitutions didn't mess anything up. On the contrary, they're delicious! Really crunchy and with a nice honey scent that matches with the Panna Cotta ^o^
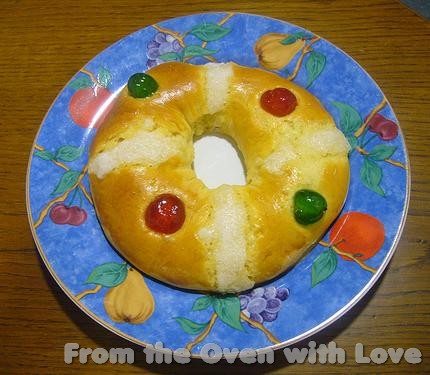
The roscón de reyes is the typical spanish cake eaten the Epiphany day, which marks the end of the Christmas celebrations. It's eaten for breakfast with a cup of hot cocoa and whoever finds the bean or figurine hidden inside of it must pay for the next year's roscón.
The roscón is aromatized with orange flower water and citrus zest (usually orange and lemon zest) and decorated with candied fruits.
Every year on the 5th and 6th of January there are long queues in front of the bakeries in order to get freshly baked roscones and thus, when one of my friends told me that she was trying to bake her own cake but was having some trouble with the raising, I suggested her to come to muy home and give it a try together :-)
I love baking, that's obvious, but I've never baked before along with somebody else and I'm happy that I finally did it! It's waaaaay more fun!
So, my friend came home on the 5th in the afternoon and we finished by the evening-early nigth ^^ It looks like her problem had something to do with the way the recipe indicated how to deal with the yeast, but it's solved now. The resulting cake was fluffy and tasted nicely even though we didn't add much orange flower water.
We made 2 cakes out of the recipe, one for her, one for me, but the original recipe is meant to be for making a cake enough for four people.
Ok then, here's the recipe for a four-people roscón (or 2 smaller ones):
Ingredients:
20ml lukewarm water 4g active dry yeast 40g melted unsalted butter (you can use salted butter) a pinch of salt (skip this if you're using salted butter) 50ml milk 250g all-purpose flour (and 50g more for kneading) 40g sugar 1/4 teaspoon orange flower water 1 large egg, lightly beaten Grated zest of 1/2 lemon and 1/2 orange 1 bean
For decoration:
Candied fruits 40g sugar Water (the ammount depends on how you want the sugar to be on the roscón) 1 large egg, lightly beaten Method:
In a small bowl, pour the warm water and sprinkle it with yeast and let stand for 5 minutes. Stir to dissolve yeast completely.
In another bowl mix together the egg and the sugar until well combined.
Then add the milk and the orange flower water to the eggs and mix until well combined.
Add the melted butter to the egg mixture and, again, mix until well combined.
In a large mixing bowl, stir together the flour, salt and orange and lemon zests.
Then stir in the yeast and the egg-milk-butter mixture. The dough should be very soft but don't worry, we're going to incorporate more flour while kneading.
Dust the counter with the rest of the flour, transfer the dough to the counter and knead the dough for 5 minutes to form a soft and sighly sticky ball. When the dough comes together, put it back in the bowl and cover it with plastic or a tea cloth and let it raise for 1 hour in a warm place.
After the raising the dough will stick to the bowl. Punch the dough down and roll it to form a ball. Then push your thumb through the middle of the ball to make a hole. After this begin to roll the dough around your wrist to widden the hole (like a hula hoop) and get the traditional look of the roscón (something like a huge doughnut). Transfer the dough to an oven rack.
Hide inside the dough a bean or a ceramic figurine. Brush the dough with the egg and decorate with the candied fruits and the sugar-water mixture.
Proof for approximately 1 hour at room temperature, or until about 1 and 1/2 times its original size.
Preheat oven to 180°C.
Bake the roscón for 20-30 minutes or until golden brown with the oven rack on the middle shelf.
Transfer to a cooling rack. Wait until cooled before serving.
This picture was taken on the Epiphany breakfast, see how fluffy came out the cake? ^^